style master css tutorial
introduction
In this section you will learn
- how this tutorial works
- who this tutorial is for
- the connection between CSS and XHTML
Project goals
- To see the design for the finished project
<< table of contents | 2. css introduction >>
Welcome
When we first created our CSS editor Style Master we did it because we thought CSS, and the idea of web standards more generally, were the only way web designers would be liberated from the hacks and shortsighted solutions that characterized the early days of the web. But we also realized that CSS involved a learning curve, for designers already experienced in pre-version 4 HTML, and for those completely new to the web. That's why we have always built so much innovative help into our application, and it's also why we wrote the first version of this tutorial.
Over the years we've watched and waited as style sheets have made their way into mainstream web development. I feel that today I no longer have to open this tutorial with a treatise on why you should be using CSS and standards based HTML. Adoption of CSS, and the expectations of developers who come to our site have come so far ahead that in fact a major overhaul of the tutorial was necessary to bring it into line with the style of CSS based site that people want to create now. So welcome to the Hands on CSS tutorial, Mark II. The first thing I want to do is get you excited about the site you're going to create while you learn CSS.

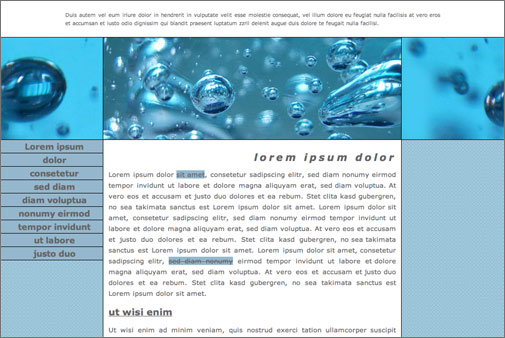
Figure 1: The finished page
And if you want to see the real thing in your own web browser, and you're connected at the moment, go here.
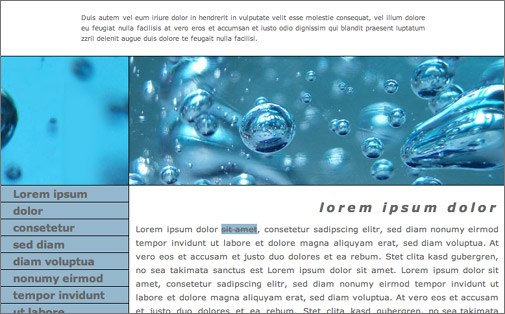
Stylish, isn't it? Can you believe it's done with semantically correct XHTML 1.0 strict markup, so it will work in browsers now and in the future, as well as degrading gracefully in older browsers? What's more it uses a fixed width for the main content area, so the layout will work well both at 800 x 600 as well as 1024 x 768 monitor resolutions. The following screenshot shows how the page will look at 800 x 600: see how it is only extra "whitespace" which is lost?

Figure 2: The finished page at 800 x 600
This is one of the tried and tested ways of creating a robust CSS page layout which is guaranteed to work reliably in the most important browsers.
And most important, with just a few hours application, you'll be able to do something exactly like this yourself. Nothing you learn here won't stand you in good stead for developing stylish standards based sites which will work in an extremely wide range of browsers now and in the future.
In this tutorial we are going to build the core style sheet for the site you see above, using Style Master or hand coding. We're going to apply this style sheet to single valid XHTML 1.0 web page, which can be used as a template for all the other pages at the site. Never again will you have to define the background color, or image, or the various link colors in an individual document. Every time you create a new page, you can simply link it to your style sheet, and you are set.
And if you want to overhaul your site, just edit the style sheet, and your whole site's appearance can change.
What will you learn in this tutorial?
This tutorial is very "hands on". Over the course of the lessons you develop a complete style sheet and see how it affects a web page, along the way learning the foundations of CSS. More specifically you'll learn
- what a style sheet is and how it actually styles a web page
- all about the HTML containment hierarchy and inheritance
- how to create a style sheet and a valid XHTML 1.0 document and link this document to the style sheet
- all about the basic building blocks of any style sheet: rules, selectors, properties and values
- the most important CSS selectors
- type
- class
- link
- id
- descendent
- group
- all the properties for controlling the basic appearance of text
- color - for text color
- font-family - for the actual font used to display your text
- font-size
- text-align - for text justification
- font-style - for italicization
- letter-spacing
- text-decoration - for underlining and striking through text
- line-height - equivalent to leading from the old typesetting days, to control the spacing between lines of text
- font-weight - to control the boldness of text
- how to customize the appearance of links
- the basics of static and absolute positioning and how to use the two together to create a fixed width page layout using all the following properties
- position: static
- position: absolute
- position: relative
- margin
- border
- top
- left
- width
- height
- padding
- the background properties
- background-color
- background-image
- background-repeat
- background-position
- all the techniques you need to turn a list of links into a semantically correct navbar
By the end of this tutorial you won't just be comfortable with all of the above, you'll have used them and seen how they can all work together to create an attractive real world web page.
How does this tutorial work?
After introducing the building blocks of a style sheet, this tutorial takes you through the development of the web page above, at every step explaining the CSS feature or technique, showing a code example, and setting a structured exercise.
Because each step is demonstrated with both instructions for using our CSS editor Style Master as well as hand coding you can approach learning CSS in any number of ways:
- totally hand code using a simple text editor like NotePad, WordPad or BBEdit
- download the Style Master demo and use its dedicated suite of hand-coding tools (color coded syntax, formatting tools and so on)
- download the Style Master demo and use its WYSIWYG editors, and watch how the CSS code develops
After you've finished you'll know how to use both Style Master and the core of CSS. You'll be up to speed with the basics, and ready to tackle more advanced CSS, perhaps armed with that essential reference, The Complete CSS Guide. The last section of tutorial looks at some directions you might want to take in learning more CSS, and points you in the direction of the very best resources available.
Who is this tutorial for?
This tutorial is for two groups of people. If you are an absolute beginner with CSS this is a great place to start. You can work through the whole project now, or if you feel you might be getting a bit of information overload, there are a couple of points where I suggest you can go off and get a bit of practice on your own projects, and then come back here later on. If you know the basics of CSS but want to learn some more advanced techniques, in particular CSS for page layout, then this is the place for you as well. You may wish to skim over the first few sections where we deal with the anatomy of a style sheet and work through the simple CSS text styling properties, and then really get into it when we start on the page layout sections.
One thing to be aware of is that everything here is done using the web standards CSS and XHTML. The content of the web you'll style is marked up with structural XHTML 1.0 elements. Top level headings are within <h1></h1> elements, paragraphs are within <p></p>, and so on. You will not find things like "the font tag". If what I've just said there is all new to you, you might consider taking a look at our self-paced course, HTML and XHTML for CSS.
Once you've done this tutorial and you're ready to strike out on your own projects then do take a look at our Complete CSS Guide. The Guide is a comprehensive reference to all aspects of CSS. You'll find it for free online at our CSS resource site, the House of Style. An extended version, complete with integrated browser support information is also available for purchase and download. This full version of the guide also comes as a bonus when you register Style Master .
Next
We'll begin with a short introduction to style sheets. Let the journey begin.

